Vernier Caliper
Caliper
A caliper is a tool that can be used to measure outside dimensions, inside dimensions, or depths of holes.
Vernier scale
Vernier scales have normal scale components, but also incorporate a small secondary scale that subdivides major increments. This secondary scale is based on a second scale that is one increment shorter than a main scale. If the secondary scale is compared to the main scale, it will indicate relative distance between two offsets. It is generally located on the smaller sliding portion of the caliper. It gives the least significant digits in the reading, and sub-divides a mark on the main scale into 10, 20, or 50 subdivisions. Read the vernier scale at the point where a vernier line and a main scale line best line up. Combine the main scale reading with the vernier scale reading to get a final reading.

Figure 1: Vernier scale Vs. Main scale
Why Vernier scales?
Most common measuring instruments have a simple scale. For example in using a ruler, the ruler is placed next to the item being measured and the mark closest to the end of the item is recorded. If we want increased precision, we use a ruler with finer divisions on the scale, that is a smaller instrument least count. Measuring the length of a specimen with coarse and fine rulers. On a ruler with a coarse scale, least count of 1 cm, the specimen is between 3 and 4 cm, and we estimate it to be about 3.3 cm.

Figure 2: Coarse scale
On a ruler with a finer scale, least count of 0.1 cm, the specimen is between 3.3 and 3.4 cm, and we estimate it to be about 3.38 cm.

Figure 3: Finer Scale
The ability to use high precision scales is limited by the spacing between the marks. Thus it is easy to have a least count of 1 mm, more difficult to have a least count of 0.2 mm, and virtually impossible to have a least count of 0.002 mm, a human hair has a diameter of about 0.050 mm. In order to increase precision we need an auxiliary scale called a vernier scale.
The vernier scale is a series of numbers and lines scaled to gain better accuracy in measurement. The vernier scale subdivides the least count from the main scale into various subdivisions.
Any instrument that uses a vernier will have two scales, a main scale and a vernier. A measurement is made by combining the readings from the two scales. The main scale works just like a ruler. In taking the reading from main scale use the mark left to the zero (0-mark) of vernier scale, not the mark left to the edge of the vernier scale. Record the value of the main scale mark that is just to the left of the vernier zero mark as is shown in the diagram. Reading is 3.3 cm rather than 3.4 cm, even though the answer is closer to 3.4 cm.

Figure 4: Finer main scale and Vernier scale
The reading on the vernier scale is used to find the internal division by looking for where the divisions in the main and vernier scales align exactly. Now look closely at the vernier scale in Figure 3v. Notice that vernier scale is divided into ten divisions so that these ten divisions are the same in total length as 9 divisions of the main scale. Decide which vernier mark comes closest to matching a main scale mark in the figure 3v, vernier mark is 8. Combine the two readings to give the final length of 3.38 cm.
Vernier Caliper
Calipers are one of the most common precision-measuring tools. It is a multifunction device used in linear distance measurements to gain an additional digit of accuracy compared to a simple ruler. It measures external, internal, and depth features, they are available in many styles, shapes, and sizes.
It is a combination of a ruler with jaws and a measuring system consisting of an L-shaped frame with a main scale (linear scale) engraved on the beam, and an L-shaped sliding attachment with a vernier scale, used to read directly the dimension of an object represented by the separation between the inner or outer edges of the two shorter arms. The length of this main scale determines the size of the caliper. One jaw of the caliper is fixed, and the other jaw moves and is connected to the vernier. Most models are fitted with an extension rod (depth probe) for measuring the depth of holes.
Most vernier calipers have separate upper and lower scales, which usually allows direct measurement in the inch and metric system. The vernier caliper may be used for taking both inside and outside. The outside measurements of an object is measured using outside caliper jaws, the inside measurements of a hole using inside caliper jaws, or the depth of a hole using depth probe.

Figure 5: Vernier caliper
1 - Outside caliper jaws; 2 - Nibs or Inside caliper jaws; 3 - Sliding assembly; 4 - Final locking screw; 5 - coarse locking screw; 6 - Fine adjustment thumbscrew; 7 - Vernier scale or sliding scale, centimeters; 8 - Vernier scale or sliding scale, inches; 9 - Beam or Main bar; 10 - Main scale, centimeters; 11 - Main scale, inches; 12 - Depth probe or Extension bar.
1. Outside caliper jaws: These are used to close around the outside of an object. These jaws of the calipers are used to measure the linear distance between two exterior surfaces i.e. external measurements are made by closing the jaws over the piece to be measured. One jaw is attached to below the main bar while the other bar is attached to below the slide assembly. They are spread apart by moving the slide assembly along the main beam until the spread between the jaws is greater than the distance to be measured. After the spread is wide enough they can be closed until the edges of the jaws touch the two surfaces allowing for a measurement to be taken. The outside edge tapers to a point at the bottom of the jaw. The inside surfaces of the jaws are machined to a high tolerance of flatness, which allows for precision in measurement.
2. Nibs or Inside caliper jaws: These jaws fit into a hole and measure the inside dimension. The nibs are used in the same way as the jaws except the nibs measure the linear distance between two interior surfaces i.e. internal measurements are made by opening up the nibs to obtain the inside diameter contacts. The nibs attach in a similar manner to the jaws, one being attached to the top of the main bar and the other attached to the top of the slide assembly. The inside edges of the curve to a point at the top of each nib. The outside edges of the nibs, like the jaws, are machined to a high tolerance of flatness.
3. Slide assembly: The slide assembly is a separate part, that slides to the right along the main bar. The Vernier scale of two different types of units, metric on the top and English on the bottom. is graduated on the front face of the slide assembly. It also consists of final locking screw, coarse locking screw, fine adjustment thumb screw.
4. Final locking screw: The final locking screw locks the lower jaw so that the caliper can be removed from the object to be read.
5. Coarse locking screw: With both locking screws loose the lower jaw is free to move. Initially close the jaws loosely around an object and then tighten the Coarse Locking Screw.
6. Fine adjustment thumbscrew: It allows the jaws to be closed to a close fit.
7. Vernier scale or sliding scale, centimeters: The scale graduated on the top face of sliding assembly of the caliper.
8. Vernier scale or sliding scale, inches: The scale graduated on the bottom face of sliding assembly of the caliper. It gives the least significant digits in the reading in inch scale.
9. Beam: The scale, which is stamped, graduated, on the beam main bar. It occupies the majority of the total length of the calipers. On the back of the beam (main bar) is a slot for the extension bar to slide through. The scale is graduated on the front face of the beam (main bar). Generally scale consists of two different units, metric on the bottom of the bar and English on the top or vice versa.
10. Main scale, centimeters: The scale that is graduated on the larger, fixed portion of the caliper. It gives the most significant digits in the reading. Make the reading to the nearest least count of the main scale opposite the zero of the vernier. Readings are graduated in metric scale. First step of reading is obtained by reading this scale.
11. Main scale, inches: It is graduated on the beam of caliper, which is fixed. Readings are graduated in inch scale. Similarly here also first step of reading is obtained by reading this scale.
12. Depth probe or Extension bar: It is used to measure the depth of the hole. It is attached to the slide assembly and slides in a groove along the backside of the main bar. On the end of the extension bar there is a small square cutout that reduces the height of the extension bar. The cutout allows for depth to be measured in tight spaces.
Least count of instrument
The size of the smallest division on a scale is called as the least count of the instrument. It is the smallest measurement that can be taken by the instrument. It is different for English and Metric systems of measurements. For the main scale on the common vernier caliper this is probably 0.5 mm. With the vernier scale the least count might be 0.02 mm in metric system and 0.001" in English system.
How to determine the least count?
There are two methods used to find the least count of the instrument.
Metric System
1st Method
In this main scale of vernier caliper is graduated with 0.5 mm and 1 mm marks. Further vernier scale is obtained with 25 equal divisions that are equal to main scale 24 divisions of 0.5 mm marks i.e. 12 mm. Least count can calculated by following method:

Figure 6: Each centimeter on the main scale of a metric standard Vernier caliper is subdivided into 20 equal parts
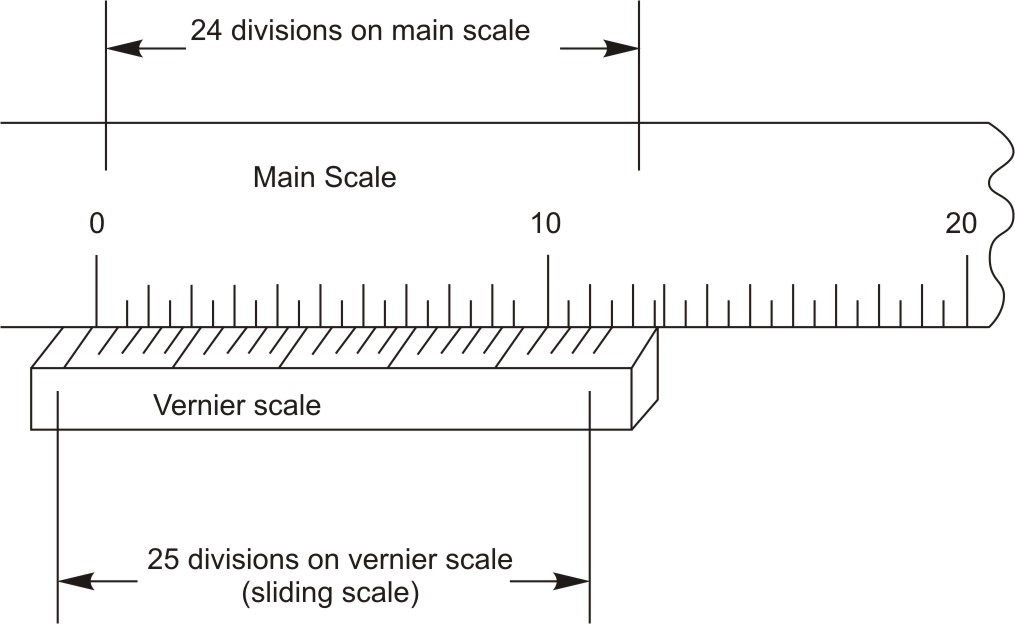
Figure 7: The difference between main scale graduations and Vernier scale graduations is 0.02 mm
25 vernier divisions = 12 mm
1 vernier division = 12 ÷ 25 = 0.48
Least count = value of one main scale division - value of one vernier scale division
One main scale division = 0.5 mm
One vernier scale division = 0.48 mm
Least count = 0.5 - 0.48 = 0.02 mm
2nd Method
In this main scale is graduated with 1mm and 0.5 mm marks. Vernier scale is obtained with 50 equal divisions which are equal to 49 main scale divisions of 1 mm i.e 49 mm. Its least count can be calculated by following method.

Figure 8: Each centimeter on the main scale of a metric standard Vernier caliper is subdivided into 10 equal parts

Figure 9: The difference between main scale graduations and Vernier scale graduations is 0.02 mm
50 vernier divisions = 49 mm
1 vernier divisions = 49 ÷ 50 = 0.98 mm
Least count = value of one main scale division - value of one vernier scale division
One main scale division = 1 mm
One division of vernier scale = 0.98 mm
Least count = 1.00 - 0.98 = 0.02 mm
English system
In this system of measurement least count of instrument can be determined by following methods.
1st Method
In this each inch on main scale of the instrument is divided into 10 equal parts and value of each division becomes 0.1 inch or 1/10 inch and it is known as main division. Further this main division is divided into 4 equal parts and value of each division becomes 0.025 inch or 1/40 inch and it is known as sub-division. Vernier scale is obtained with 25 equal divisions, which are equal to 24 sub-divisions of main scale i.e. 0.025" X 24 or 24/40 inch. Least count can be calculated by following method.

Figure 10: Each inch on the main scale of an inch-standard Vernier caliper is subdivided into 40 equal parts

Figure 11: The difference between main scale graduations and Vernier scale graduations is 0.001 inch
25 vernier division = 24/40 inch
1 vernier division = 24/40 X 1/25 = 24/1000" = 0.024 inch
Least count = value of one main scale division - value of one vernier scale division
One main scale division = 1/40 inch or 0.025 inch
One vernier scale division = 0.024 inch
Least count = 0.025" - 0.024" = 0.001 inch
2nd Method
In this each inch on main scale of the instrument is divided into 10 equal parts and value of each division becomes 0.1 inch or 1/10 inch and it is known as main division. Further this main division is divided into 4 equal parts and value of each division becomes 0.025 inch or 1/40 inch and it is known as sub-division. Vernier scale is obtained with 25 equal divisions, which are equal to 49 sub-divisions of main scale i.e. 0.025" X 49 or 49/40 inch. Least count can be calculated by following method.
25 vernier division = 49/40 inch
1 vernier division = 49/40 X 1/25 = 49/1000" = 0.049 inch
In this method least count is determined by taking the difference of value of two main scale division and one vernier scale division, this is done as the value of vernier scale divisions, 0.049 inch, is more than the value of main scale division, 0.025 inch, but it is less than the sum of two divisions of main scale, 0.050 inch.
Value of two main scale division = 0.025" x 2 = 0.050"
Vernier scale one division = 0.049"
Least count = 0.050" - 0.049" = 0.001" inch
Reading a vernier caliper measurement
Reading the vernier caliper instrument is done in two steps, i.e reading the main scale and, reading the vernier scale. A measurement on the vernier is designated by the positions of the zero line of the vernier and line on the vernier that coincides with the main scale. The following steps may be followed for taking the readings.
1. Read the number of full centimeter graduation(s) on the main scale (fixed scale on beam) which is left of the 0 mark on the Vernier scale. In the figure 11v, this is 2 cm.

Figure 12: Example metric vernier scale
2. Read the number of millimeters graduation(s) on the main scale (fixed scale on beam) beyond the last full centimeter to the zero of the vernier scale. The figure 11v shows O.5 mm, which makes the main scale reading to be 2.05 cm.
3. To read the vernier scale, read along the Vernier scale until you establish which Vernier scale line (graduation) exactly coincides (aligns) with a line (graduation) above on the main scale (fixed scale on beam). In the In the figure 11v, the 11th graduation mark on the vernier scale is in coincidence with the one above it on the main scale. So it gives a contribution of 11 X 0.02 = 0.22 mm. This means 0.22 is to be added to the main scale reading.
4. To get the final reading, simply sum up the main scale reading and the vernier readings. i.e. 2.0 + 0.05 + 0.22 = 2.27 cm
5. Retake the measurement and recheck the reading for accuracy.
Note: The number of the aligned graduation mark on the vernier scale tells you the number of tenths of millimeters. The following figure explains the meaning of alignment of vernier scale graduation mark with the main scale graduation mark i.e. 3rd graduation on the vernier scale most perfectly aligns with 2.4 cm graduation mark on the main scale.

Figure 13: Scale depicting alignment of graduations
Reading a inch scale vernier caliper measurement
Consider the following most common vernier scale design with 25-subdivision. The close up shows the main scale of the vernier caliper graduated in inches, with every inch divided into 10 subdivisions. Each of these subdivisions is further divided into fourths. Therefore, every graduation on the main scale is equal to 0.025 inch or one-fortieth of an inch. The vernier scale is graduated with 25 equi distant marks, marked from 0 - 25.
Follow the steps given below to find the measurement in inches for the vernier scale shown below.
1. Read the number of full inch graduation(s) on the main scale (fixed scale on beam) which is left of the 0 mark on the Vernier scale. In the figure 14 it is 2 inch.

Figure 14: Inch vernier scale example
2. Read the number of inch division graduation(s) on the main scale (fixed scale on beam) beyond the last full inch and which is left of the 0 mark on the Vernier scale. The figure shows O.5 inch, which makes the main scale reading to be 2.5 inch.
3. To read the vernier scale, look along the Vernier scale until you establish which Vernier scale line (graduation) exactly coincides (aligns) with a line (graduation) on the main scale (fixed scale on beam). In the In the figure 13v, the 12th graduation mark on the vernier scale is in coincidence with the one above it on the main scale. So it gives a contribution of 12 X 0.001 = 0.012.
4. To get the final reading, simply sum up the main scale reading and the vernier readings. i.e. 2.000 + 0.500 + 0.012 = 2.512 inch.
5. Retake the measurement and recheck the reading for accuracy.
Instructions for using vernier caliper
As with all measuring tools, proper technique is required for using a caliper. Measurement inaccuracies and poor repeatability usually occur because of poor measuring techniques. Stick to the following guidelines and you can expect good results:
1. Check that the vernier caliper correctly reads zero when the jaws are closed.
2. Close the jaws lightly around the object, do not over tighten. The jaws should exert a firm pressure on the object. Avoid using only the bottom of the external jaws ensure that the faces of the calipers jaws are properly seated with the workpiece. If necessary, slightly move the caliper or component until you feel proper alignment.
3. Objects axis must be in line with the measuring system for maximum accuracy. If you are measuring something with a round cross section, make sure that the axis of the object is perpendicular to the caliper. This is necessary to ensure that you are measuring the full diameter and not merely a chord.
4. When both locking screws are tightened the caliper can be removed from the object and read without worrying if the jaws will shift position.
5. If your eyes arent centered over the vernier scale, parallax errors can occur when the two scales of the vernier are on different planes.
6. Internal jaws often have bent tips, and external jaws can have burrs. Closing the jaws and holding the caliper up to light is a common practice to check the condition of the jaws. If light is seen between the external jaws, they may not be flat or parallel and are probably worn.
7. Check the depth rod, as it may not be flush with the calipers beam.
8. Always check that the component to be measured is clean.
9. Never use the vernier caliper to measure parts being rotated, such as those turning on a lathe.
10. Check the beam and measuring surfaces for burrs and scratches. The movement should be free of rough spots. Remove surface imperfections with a hard Arkansas stone. Check the carriage for excessive play.
Cleanliness is one of the first prerequisites for accurate measurements. Wipe and clean the caliper after using, and don't throw it on the workbench. When not in use, keep calipers in a protective case away from excessive temperature and humidity, with the jaws slightly open. Calipers should always be stored horizontally. If they wont be used for an extended time, consider using a rust-preventive. Clean a caliper with a lint-free cloth and proper cleaning solutions.
| Tutorial 3 | Tutorial 5 |