Using Punches
Punches are used to punch holes in metal, leather, paper and other materials; mark metal, drive pins or rivets; to free frozen pins from their holes; and a line holes in different sections of metal. Special punches are designed to install grommets and snap fasteners.
Types of Punches
The most common punches are the solid punches they have various shaped points. Hollow punches have a circular cutting edge and are sized according to their cutting diameter. Blacksmiths use solid punches that have handles.
Solid Punches
Solid punches are made to mark materials, to drive out straight or tapered pins. To mark metal for starting holes to be drilled to a line holes in different sections of metal and to punch holes by hand in metal up to 3 mm of thickness.
Figure 1: Solid Punch
A center punch has a narrow cone shaped point terminating in a sharp 90 degrees conical tip. The stock of a center punch may be octagonal, round or square in shape, with or without knurling. An automatic center punch is also used for same purpose. Where other center punches require a hammer blow by hand to mark metal, the automatic center punch contains a mechanism which automatically strikes a blow of the required force when the punch is in the exact position desired by the operator and is pushed forward by hand pressure. It has an adjustable cap for regulating the stroke and the point is removable for regrinding and replacement. Center punches are normally used for starting holes to be drilled.
Figure 2: Automatic Centre Punch
Drift and aligning punches- Drift and aligning punches are normally tapered to a points and range in different lengths. Drift and aligning punches are used to line up holes in metal work.
Figure 3: Drift and aligning punches
Drive pin punch- Drive pin punches are used for driving out straight or tapered pins. The standard drive pin punches taper to a point. Some drive pin punches are straight and without taper. The shanks may be hexagon shaped or round knurled for better gripping. Some drive pin punches have long tapers.
Figure 4: Pin Punch
Prick punch- The prick punch is used for marking soft metal such as brass and has a long tapered cone shaped point terminating in a sharp 300 conical tip.

Figure 5: Prick punch
Hollow punches- Hollow punches are made to cut out gaskets, and to cut holes in leather, canvas, paper and metal.
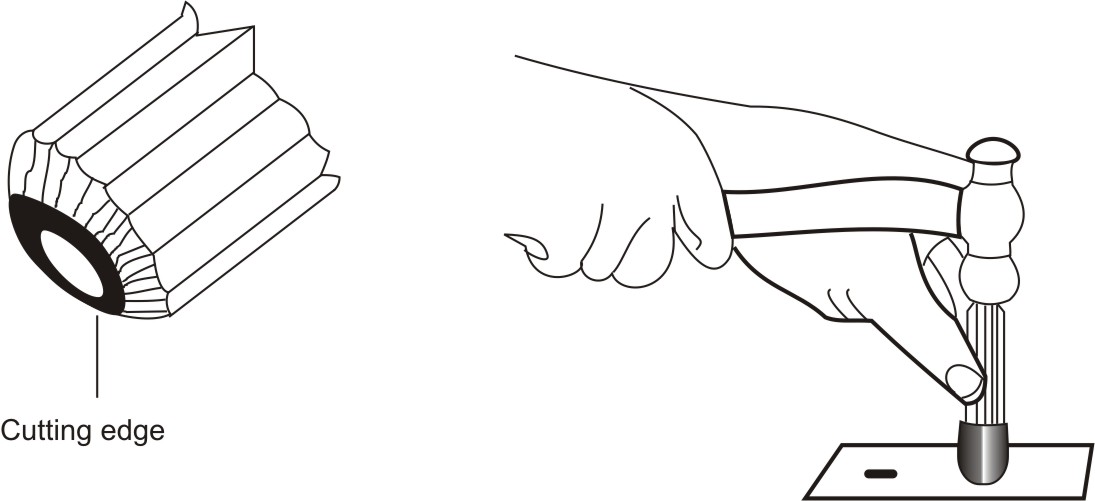
Figure 6 (a): Hollow punche
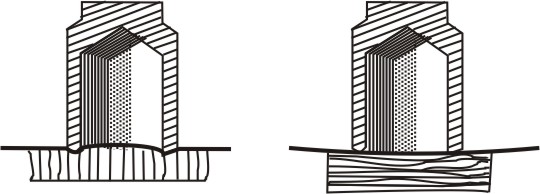
Figure 6 (b): Hollow punche
Use a punch only for the purpose for which it is intended and designed, e.g.
a. Hold the punch lightly in the fingers of one hand approximately in the middle.

Figure 7
b. Strike the end with a heavy hammer. Place a block of wood under the work before cutting out holes with a hollow punch to prevent damage to the edge of the punch after it finishes the cut.
c. Thicker materials may need more than one blow. Use a thick material such as lead cake or an end grain wood block to prevent distortion.
d. Locate end of punch at the point to be marked for a pin to be driven, or a hole to be cut, at an angle so that one can see the point. Straighten punch after locating, so that it is perpendicular to the work. Do not strike head of punch with a hammer until the punch is perpendicular.
e. When punching holes in metal, use a center or prick punch to mark the center. Scribe the desired circle with a pair of dividers. Select the proper size and type of punch. Locate punch on scribed circle and strike head with a heavy hammer until hole is cut. Use a solid punch and die in a punching machine for punching holes in metal up to 6 mm thickness. Use a hollow punch for holes in thin sheet metal and in soft material.
f. When using blacksmith's punches, be sure that the hot metal is securely held and cannot be knocked off the bench or anvil. Also make certain that the handle is tight.
g. Never use a punch that has a mushroomed head or whose point or cutting edge is dull.
h. To use the automatic center punch, turn, cap down or clockwise for work requiring a heavy mark. For work requiring a light mark, turn cap up or counter clockwise. No hammer blow is needed. Place the punch in an upright position on the spot to be marked and downward pressure releases the internal striking hammer and makes the impression without danger of possible injury to fingers if the hammer slides off the head of the punch. This punch is mostly used by toolmakers where more accurate and delicate work is required.
i. To use the revolving belt punch, hold the punch in one hand by the handles like a pair pliers. Position the leather belt over the die in the lower jaw with the other hand, after marking the spot to be punched. Then, using the thumb of the hand that is holding the punch, rotate the tube wheel until the desired size tube is opposite the die and likewise is directly over the marked spot on the belt. Squeeze the handles to punch the hole. The punch is held perpendicular to the wood between fingers and thumb of one hand.
j. For correcting the centre point, If your first attempt at making the mark does not exactly correspond with the intersection, angle the punch toward the centre and strike again; this willmove the punch mark to the exact centre. Even up the punch mark by holding the tool perpendicular and striking it again.
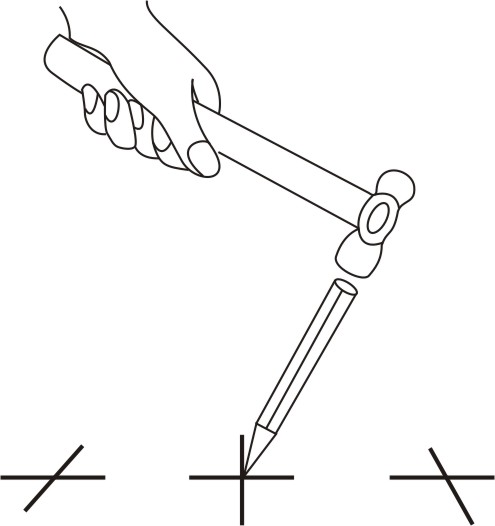
Figure 8
k. For Making holes in sheet metal, one can use a drill to make the holes but a sheet metal punch produces a stronger fixing which gives the screw threaded more support.
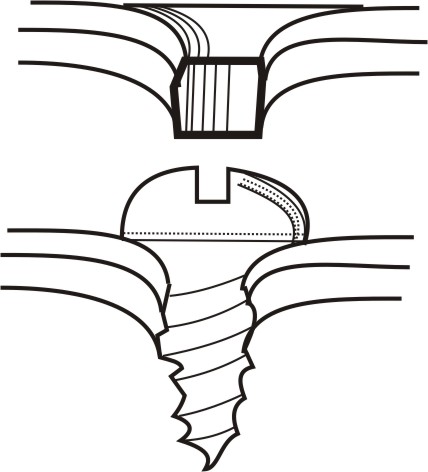
Figure 9
a. After using a punch wipe it clean and apply a thin film of oil to prevent rusting. Carefully place punches and dies on a shelf, rack or other suitable place to avoid damaging their cutting edges.
b. For long periods of storage, apply rust preventive material to all metal parts, protect points and cutting edges and store carefully.
Grinding and Shaping
Grind a punch so that the end is perfectly flat and at right angle to the centerline of the punch. The following procedure of grinding may be followed:
a. Adjust grinder rest so that the end of the punch is opposite the center of the abrasive and can be ground square.
b. Place punch on work rest and feed end of punch onto abrasive wheel. Rotate during grinding to obtain a flat surface.
c. Dip punch in water frequently to preserve.
d. Do not grind away more metal than is necessary to obtain a flat, nick free end.
| Tutorial 15 |